The first time we wear a tie for most Indian boys and men is before a school function, a job interview, a wedding or an important meeting at office. And that moment feels stressful. It resembles a long strip of cloth, the type men wear when in suits. You fold it once. Then twice. Suddenly it becomes a mess. If you are looking for how to tie a tie, relax. You are not alone. In this mega guide, I will tell you everything in very simple steps. No confusing words. No fashion jargon. Just basic steps anyone can follow. You will not only learn how to tie your tie using these steps, but you will definitely feel able to complete it in under 2 minutes by the time you reach towards the end of this article.
Why Learning How to Tie a Tie Is Important
This is because in India, a tie is still a way of showing professionalism and respect. Whether it is:
- A job interview
- A corporate meeting
- A college presentation
- A wedding reception
- A formal event
Most people do not know how to tie a tie, and that is why a knot in this necktie looks very correct.
You don’t need expensive clothes. A well-tied tie can make even a plain shirt look smart.
Before You Start – Basic Things to Know
Before you learn to tie a tie, here are a few elementary things you should keep in mind:
- A tie has two ends:
- Wide end (the thicker side)
- Narrow end (the thinner side)
- The wide end should dangle longer than the small end when you begin.
The tip of the tie should reach your belt buckle.
How to Tie a Tie: Method 1 – The Four-in-Hand Knot (Easiest Method)
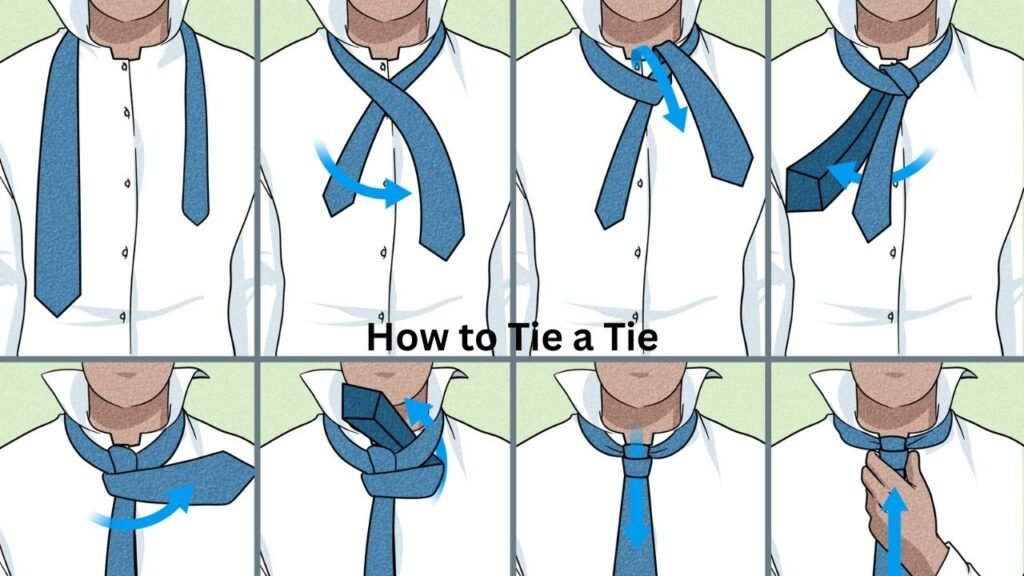
This is the simplest and most common way. If you are a beginner, start with this method.
Step-by-Step Guide
Step 1: Put the Tie Around Your Neck
- Keep the wide end on your right side.
- Keep the narrow end on your left side.
- The wide end should hang longer (around 10–12 inches lower).
Step 2: Cross the Wide End Over the Narrow End
Make an “X” shape near your collar.
Step 3: Wrap the Wide End Behind the Narrow End
Take it behind and bring it back to the front.
Step 4: Pass It Over the Front Again
Wrap it once more in front. Now you will see a small loop near your neck.
Step 5: Bring the Wide End Up Through the Neck Loop
Insert it from underneath.
Step 6: Pull It Down Through the Front Loop
There will be a small horizontal loop in front. Pass the wide end through it.
Step 7: Tighten the Knot
Hold the narrow end and gently pull the knot upward towards your collar.
Adjust properly.
Done.
That’s the Four-in-Hand knot. Simple and clean.
When Should You Use the Four-in-Hand Knot?
This knot is perfect for:
- School uniforms
- Office wear
- Daily formal use
- Slim ties
- Casual formal look
It is slightly narrow and looks modern.
How to Tie a Tie Method 2: The Half Windsor Knot
If you want a slightly more formal look, this method is better. It looks more symmetrical and professional.
Step 1: Place the Tie Around Your Neck: Wide end on the right. Narrow end on the left.
Step 2: Cross Wide Over Narrow: Make an X shape.
Step 3: Bring the Wide End Behind and Up: Take it behind the narrow end and pull it up through the neck loop.
Step 4: Bring It Down on the Left Side: Now it should hang on the left.
Step 5: Pass It Across the Front: Take it across to the right side.
Step 6: Bring It Up Through the Neck Loop Again: Insert from underneath.
Step 7: Pull It Down Through the Front Loop: Slide it down carefully.
Step 8: Tighten and Adjust: Make it neat and centered.
The Half Windsor knot looks balanced and sharp.
When Should You Use Half Windsor?
- Job interviews
- Corporate meetings
- Weddings
- Important presentations
It gives a strong first impression.
How to Tie a Tie Method 3: The Full Windsor Knot
This knot looks big and powerful. It is mostly used for very formal events. The process is slightly longer but manageable.
Step 1: Start with the Tie Around Your Neck Wide end longer on the right side.
Step 2: Cross Wide Over Narrow: Make an X.
Step 3: Bring Wide End Up Through the Neck Loop Pull it down on the left.
Step 4: Wrap Behind the Narrow End Bring it to the right side.
Step 5: Bring It Up Again Through the Neck Loop Pull it down on the right side.
Step 6: Pass It Across the Front Move it from right to left.
Step 7: Bring It Up Through the Neck Loop Again Insert from underneath.
Step 8: Pull It Down Through the Front Loop Adjust properly.
The Full Windsor looks thick and symmetrical.
When Should You Use Full Windsor?
- Wedding functions
- Business conferences
- Formal corporate events
- When wearing a wide collar shirt
It gives a powerful and confident look.
Common Mistakes While Tying a Tie
Many people make small mistakes. Let’s avoid them.
1. Tie Too Long or Too Short
The tip should touch your belt buckle.
Not above. Not below.
2. Loose Knot
Always tighten the knot near your collar.
A loose knot looks careless.
3. Twisted Tie
Before tightening, check that the tie is flat.
4. Dirty or Wrinkled Tie
Iron your tie if needed. A wrinkled tie spoils the whole look.
How to Choose the Right Tie
Knowing how to tie a tie is important. But choosing the right tie is equally important.
1. For Job Interviews
Choose solid colors like:
- Navy blue
- Black
- Dark grey
- Maroon
Avoid loud prints.
2. For Weddings
You can wear:
- Silk ties
- Patterned ties
- Bright colors
3. For Office Use
Keep it simple and classy.
Tie Care Tips
A good tie can last many years if you take care of it.
1. Don’t Pull Hard While Removing Loosen it step by step.
2. Hang It Properly Don’t throw it on the chair.
3. Roll It While Traveling Rolling prevents wrinkles.
How to Tie a Tie for School Students
It is a daily battle for thousands of Indian school students.
- So here is an easy way for them to go about it –
- Use the Four-in-Hand knot.
- Practice at home 5–6 times.
- After the first week, it is simple.
Parents have the option to record a video just once as well. Kids can replay and learn.
Confidence Comes from Practice
This is confusing the first time you do it. Second time will be better. The fifth time, you will no longer think, your hands will just move. Keep in mind that even CEOs and professionals have googled “how to tie a tie“ before.
No one is born knowing it.
Final Words for How to Tie a Tie
It is a piece of cake to learn how to tie a tie. You just need:
- Clear steps
- 5 minutes of practice
- A little patience
Start with the Four-in-Hand knot. Then try Half Windsor. Later, try Full Windsor. Before long, you will be tying your tie in less than one minute and you won’t even have to think about it. And when someone else is having a hard time, you will be the one mentoring them. That feeling is great.